

Welcome to the DummyStore.net blog, chronicling the adventures (and misadventures) of building professional ventriloquist dummies. It features tips, tricks and utter failures. Please feel free to submit comments, critiques and helpful suggestions.
Monday, May 30, 2011
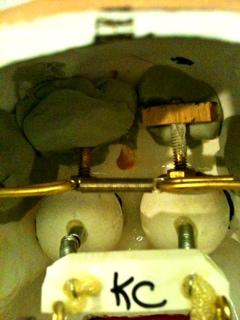
I like to watch
Sunday, May 29, 2011
What I learned today
 Loops
LoopsRather than tie knots, I've discovered the simple elegance of tying loops. Makes everything work smoother. Why?
I have no idea.
Slide on down
I have a large vice for holding things that are about to go under some serious procedure. But on my hand-work space, I've been fumbling with holding my subject still with my hands. That's because the ledge on my former workspace couldn't hold a small vice in place. So I got in the habit of just fumbling.
But my new workspace has a good ledge. So I have attached a small vice with a clamp that's easy to loosen and tighten. I keep it on my far left out of the way. When I need it, I loosen the clamp and slide it in front of me. When I'm finished tweakin', I loosen the clamp and slide it back out of my way.
I can see less cussin' in my future.

Saturday, May 28, 2011
B&W
 If I was working in the 1950's, then my post (ne: magazine article) would feature a photo in Black & White. Of course, there are a few items in this photo that give away its more recent vintage.
Can you name them?

Tuesday, May 24, 2011
How now brown
 The brown irises I have are a little golden in color rather than a dark brown. So I popped them out of the eyeball and painted acrylic raw umber in the routing. When I placed the iris back in the eye, the color was much darker.
Monday, May 23, 2011
Keep your chin up
 My full-size figure can now do chin-ups because now he has a chin. Well... he could do chin-ups if he had a body... and real arms... but I digress.
The tricky part will be working on the underside of the chin so the jaw will open trouble-free. That's the next step.
Hey! What the &%*! 's goin' on here?
Yes, another session of code and graphics... graphics and code. Hope you like (or at least get used to) the new design.
Shop 'til I drop

 My shop, a converted 2-car garage, is up, running and nearly completed. All of my tools and supplies have found a home and now I'm actually makin' dummies.
I still have a few more chores, like hanging the drapes. I'll have red drapes along the back wall covering the windows. I'll use the drapes as a backdrop when I shoot photos and video of my little fellas. It'll be like a TV studio!
There's actually more room behind the work table on the right. I have a couple of dressers with supplies, an open area (TV studio), an art table and a wall of bookshelves.
Learning to work in this new shop has been a joy. Now... back to work!
Saturday, May 21, 2011
Q-R Code

What's this? Some kind of computer game board? A maze? A Rorschach test?
Nope. It's a Q-R code that, when scanned by your iphone, will take you to specific websites on your phone's browser. The one on top will take you to this "Vent Into The Mic" blog. The lower one takes you to my "Kenny Croes Dummy Store" website. There's a free app called QRReader that will scan the image.
Go to http://qrcode.kaywa.com/ to get yours. You can place the image on marketing materials, websites, business cards, dummies, etc.
Freaky, huh?
(Thanks to Buzz James at Braylu for showing me this).
It ain't pretty
 I'm always a little taken aback when I see the inside of a head. The face may look perfectly pleasant, but the inside is a tangle of epoxy, metal and wood.
 Here's a peek inside the head I'm working on where I set the eyes separately without an eye tray. The eyes are suspended from the top of the head. Each eye's pivot bolt was screwed inside a small piece of wood. The wood was inset into Magic-Sculpt that was affixed to the interior forehead area. After it dried, I covered it with a thin layer of Magic Sculpt to secure it in place (like the eye on your left). The eye on your right will be covered next.
The downside of this method for me is that I can't make crossed eyes the same way because I'm concerned the torque required to make them cross will eventually detach the Magic-Sculpt from the head (though the attachment feels very secure). I thought of another way that will apply torque side-to-side, but I'm concerned the cords may end up too deep in the head for clear movement. Unfortunately I thought up this second method after I set these eyes in place. I'll try that experiment on my next feller.
Thursday, May 19, 2011
Primal scream
 Their yappers are wide open. No jaws. Mr. Winkle and Henry (both spoken for) just received their coat of primer. Their jaws have been fit and primer-coated, as have the trap doors.
Important to prime before painting on their rosey complexions. I like to use M. Graham & Co.-brand acrylic paints, available at most art supply stores.
Wednesday, May 18, 2011
I can hear out of both ears


 It was a struggle to duplicate the ear on the left. I think I made four or five attempts before getting it done. It's hard to duplicate something because there's always a little luck in getting it right the first time.
I took a close-up photo of the left (its right) ear and displayed it on my large computer screen. Then I formed the right while staring at the contours of the original. But the luck comes in when you realize you don't have the very exact amount of clay under your thumb.The difference is small... but it makes a difference. I'll add a touch of fill here and there and it will fix flaws.
Hey, I came as close as I could.
Sunday, May 15, 2011
An earful
 I made a cartoon ear for my full-size figure. VERY difficult. But I'm happy with the way the left one turned out.
 Now... can I duplicate it on the right?
Saturday, May 14, 2011
All ears


My full-size figure model, which I started months ago, is now in the process of getting ears. I cut the ear-shape out of styrene plastic and used Magic-Sculpt to fuse it to the head. After it dries, I'll do a little earlobe trimming, then sculpt the actual ear on top of the styrene with more Magic-Sculpt.
Hit the wall
Already I've run into trouble with my "no eye tray" approach. If I wanted the eyes to just move side-to-side, no problem. But I use small eyehooks in the eyeballs with strings attached as part of my crossed-eyes animation. When the strings are pulled, the eyes cross. But I'm concerned that the torque from the eyes being pulled will dislodge the Magic Sculpt from the head. With an eye tray, the setting is so secure, nothing would loosen or break the set-up.
Back to the drawing board.
Back to the drawing board.
Friday, May 13, 2011
Eye am, therefore eye do
 Here goes an eye experiment. I'm going to make a figure sans eye tray.
 I put a brass bolt with washer at the bottom of the eye. Then I topped it with a nut and washer. I made sure the nut was loose enough for the eyeball to spin freely, but tight enough to keep the up-and-down motion of the eye to a minimum. I committed to this first step by securing the nut in place (and thus, the eye) with Tite'n For Bolts.
My plan is to suspend the each eye individually from the top of the head. I'm going to drill a hole in a small flat piece of wood (about 1/3 the size of the eyetray), then screw in the bolt just enough for it to be even with the other side. I may drop some Gorilla Crazy-Glue to lock the bolt into the wood. Then I'll secure wood to the top of the head with Magic-Sculpt.
I may not even need the piece of wood. But if I new that, then this wouldn't be... an experiment!
A little tongue
 Actually more tongue. I like to add Magic-Sculpt to enlarge the tongue on my Cheeky Boy and Elmore characters.
By the way, the Elmore head will likely be discontinued soon. So if you ever thought of buying a head from Braylu or a completed Elmore figure from me, these will be the last in the line.
Tuesday, May 10, 2011

Monday, May 09, 2011
Poke in the eye
I'm thinking of doing away with the eye tray. You know... just securing each eye separately inside the head with Magic-Sculpt. I did it a few times on some earlier figures, but I wasn't completely happy with the result. But I think I might have a way to do it more neatly.
Hmmmm. (That's me thinking more quietly).
Oh... and I finally found my paint brushes!
Hmmmm. (That's me thinking more quietly).
Oh... and I finally found my paint brushes!
Sunday, May 08, 2011
An update from one of us

Awhile back, John wrote me for some advice on painting a figure. I recall he was having a problem with paint peel, so I suggested a primer coat first, then paint. He was nice eough to send an update:
"Hi, I'm not sure if you remember me asking you about paint but I just wanted to update you on my progress. I finally was able to get back to work on my figure and I'm no longer having issues with paint since I switched from craft paint to some model paint I use for my plastic models. I don't really plan to use the figure professionally I just enjoy building and painting things and vent figures lets me do both. He's got a classic old style paint job to him with black around his eye rims and bright red lips. I kinda kept the paint a little thin in spots letting his primer show through. To me it gives him a bit of character and a touch of that old style figures had. The head is finished just waiting some mechanics.
Well I just wanted to thank you for your great advice! If you want I can send some pictures of him when I get a chance to. He's a Brose casting."
Send us a photo, John, when you finish your feller.
Saturday, May 07, 2011
Gettin' hooked up


Installing an eye hook at the bottom of the body is a lot easier if you drill a start-hole. Because the inside of the body is too small to fit a drill, I use a small hand drill with a 3/32" drill bit.
Now that I have a stylus Dremel, I bet I could use that instead. It'll fit. (This is me thinking out loud).
I use my needle-nose pliers to pull the eyehook's opening a little wider to make it easier to slip the elastic band (attached to the bottom of the headstick) in and out.
Tuesday, May 03, 2011
Back to work


 The shop isn't quite finished, but I'm together enough to get some work done.
 Not every head casting comes out perfect. There are occasions when bumps have to be sanded and dents have to be filled. I used to apply Magic-Sculpt to fill the dents, but I got a tip from Buzz James and Mike Palma that wood filler works better on a urethane head. And they're right. The dried wood filler sands more easily and more smoothly.
I used to apply Elmer's Wood Filler back in the day when I used wood headsticks, but the texture was flakier than I liked. Today I tried Minwax Wood Filler in the tube and I like it much better. It comes out of the tube more like a paste, so it's easier to smooth over the indentation. It also sanded nicely. We'll see what it looks like after I paint on the primer coat.
Subscribe to:
Posts (Atom)