

Welcome to the DummyStore.net blog, chronicling the adventures (and misadventures) of building professional ventriloquist dummies. It features tips, tricks and utter failures. Please feel free to submit comments, critiques and helpful suggestions.
Monday, October 30, 2006
A new discovery
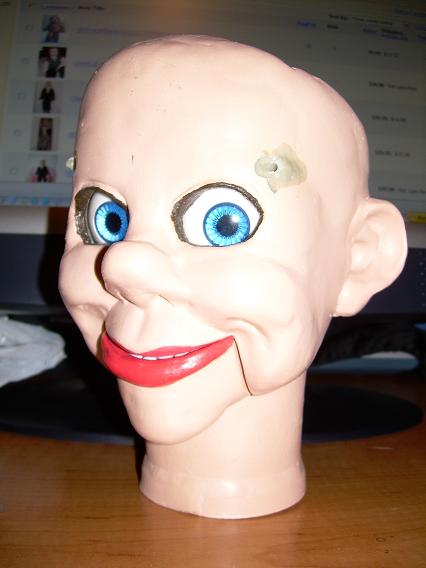
I tend to obsess about the mechanics, but my most recent discovery is in facial scuplture. I figured out a way to make really cool eye sockets. The Mike Brose-produced eyes fit beautifully and the shape of the eye sockets are much improved.
I cut out a much larger area in the upper portion of the eye socket. I use a ping pong ball as a stand-in for the real eye. Then I fill the upper portion of the eye socket inside the head with MagicSculp to envelope the upper portion of the ping pong ball for a snug fit. Then I push some of the MagicSculp forward through the eye socket to form an eyelid. The result is a perfect fit for the eye and a very cool-looking eye socket. (Photos to come).
I cut out a much larger area in the upper portion of the eye socket. I use a ping pong ball as a stand-in for the real eye. Then I fill the upper portion of the eye socket inside the head with MagicSculp to envelope the upper portion of the ping pong ball for a snug fit. Then I push some of the MagicSculp forward through the eye socket to form an eyelid. The result is a perfect fit for the eye and a very cool-looking eye socket. (Photos to come).
Sunday, October 29, 2006
Then there were 2

Charlies 4 and 5 are moving forward. I especially like the way Charlie 5 (on the left) is developing. His face makes me laugh. I seem to be moving faster with these two.
One thing I'm thinking about (which is sure to get me into trouble) is figuring out cordless mechanics. There are a couple of approaches in The Fred Project for eye movement. I think there's a method outlined for the mouth in Mike Brose's book "Figure Making Can Be Fun". I haven't come across a cordless eyebrow method, so I'll have to think about that a little more. The thing is, I don't want to get into soldering, so cords may, in the end, be the path I take. However, I am going to at least move to brass levers rather than the wood dowels I have been using.
No Ebay bids on "Poindexter" yet (previously known as Charlie3). I put a $199 starting bid on him. I have 11 Watchers so far. We'll see what price the little feller fetches.
Friday, October 27, 2006
Dummy for sale


At last, the little guy is finished. I learned a lot with this project. However Charlie 4 and 5 will present new challenges, I'm sure.
I've listed "Poindexter" on Ebay. There are more photos of him there, so take a look if you get a moment. One thing is for sure, this fella got a lot of attention along the way.
Tuesday, October 24, 2006
Signed and sealed
But not yet delivered.
I have sealed Charlie3's head and tonight the wig goes on. The head and post inserts easily into the body. His controls all work, though I am always at a slight disadvantage when testing them. You see, I am a lefty and I make the controls for a righty. Due to a birth defect, my right index finger does not extend, so I can never smoothly manipulate the controls myself. But I set them up the same way I see them positioned on Maher (Detweiler) vent figures, so I trust my buyer will be comfortable with them.
Next comes detail face painting (shading, etc). Then he'll be listed on Ebay.
Saturday, October 21, 2006
I'm better now...
So sorry for the hissy fit, but I screwed things up pretty good on Charlie3. After quiet contemplation, I finally figured out my mistake was not fatal. Here's what happened.
I had all of the mechanics with string connections done. I attempted to put the head on the body when I discovered two things. First of all, the controls on the post made it almost impossible to get the post through the hole in the shoulders. I finally got them through, but what a hassle! After I managed to get the head on the shoulders, I discovered that the mouth and eyebrow cords were getting caught up in the hole when I moved the head around. I had drilled the holes too far from the post. The reason that was a big bummer was that it would be impossible to re-tie the cord to the jaw piece because access was impossible. Oh, I was pissed off!
As I said, I finally figured out what to do. I took a saw and cut the post/lower neck away from the rest of the neck. I had to cut all the cords from all of the mechanics, drill new holes (in the proper place), fill the old holes, and do some paint touch-up. I will have to re-tie the cords (now easily accessible), and re-mount the head on the post. More apoxie and paint... and I'm back to where I was before I screwed everything up.
 I'll also put the eyebrow lever on the same side of the post as the eye/jaw levers so that insertion through the shoulder hole will be easy.
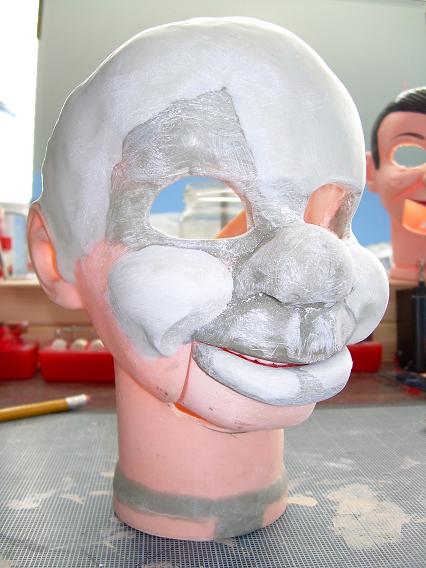
Meanwhile, here's a first look at Charlie4. The most enjoyable part of building vent figures is creating a unique new face. By the way, I have switched from ApoxieSculp to MagicSculp. The latter is easier to smooth and sand.
I had all of the mechanics with string connections done. I attempted to put the head on the body when I discovered two things. First of all, the controls on the post made it almost impossible to get the post through the hole in the shoulders. I finally got them through, but what a hassle! After I managed to get the head on the shoulders, I discovered that the mouth and eyebrow cords were getting caught up in the hole when I moved the head around. I had drilled the holes too far from the post. The reason that was a big bummer was that it would be impossible to re-tie the cord to the jaw piece because access was impossible. Oh, I was pissed off!
As I said, I finally figured out what to do. I took a saw and cut the post/lower neck away from the rest of the neck. I had to cut all the cords from all of the mechanics, drill new holes (in the proper place), fill the old holes, and do some paint touch-up. I will have to re-tie the cords (now easily accessible), and re-mount the head on the post. More apoxie and paint... and I'm back to where I was before I screwed everything up.
 I'll also put the eyebrow lever on the same side of the post as the eye/jaw levers so that insertion through the shoulder hole will be easy.
 Meanwhile, here's a first look at Charlie4. The most enjoyable part of building vent figures is creating a unique new face. By the way, I have switched from ApoxieSculp to MagicSculp. The latter is easier to smooth and sand.
Thursday, October 19, 2006
There are days....
I don't want to get into the gory details, but there are days when I wish I'd never started this vent-building. I'm sure I'll get over it, but right now I'm rather discouraged.
I'm beginning to think my sanity would be better preserved if I used Mike Brose's professional heads rather than retro-fitting Charlies. There are so many little complications that require solutions.
I seem to solve the issues, but there are days...
I'm beginning to think my sanity would be better preserved if I used Mike Brose's professional heads rather than retro-fitting Charlies. There are so many little complications that require solutions.
I seem to solve the issues, but there are days...
Sunday, October 15, 2006
Posting
The eyebrow mechanics have been built successfully. I cleaned up all of the string knots, drilled the holes for the levers, and glued the head to the post. I still have some tweaking to do, but everything works.
Next comes some ApoxieSculp to seal the head to the post. I'll hook the strings to the levers. Then comes the final detailing... eyebrow covers, wig, eyelashes, and facial shading.
The cool thing about this fella (as with his predecessors), I have learned several new tricks.
Saturday, October 14, 2006
The eyes have it... the eyebrows... almost
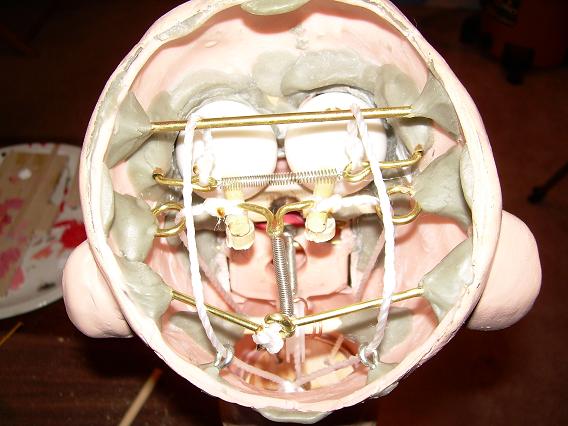
I have made self-centering eyes. My method worked! Near the very back of the head, I attached a brass crossbar with a loop in the middle to attach a centering spring, which is attached to the center of the synchro-bar on the other end. Works!
The eyebrows, however, still have a ways to go. The mechanism is sound, but the string organization isn't quite figured out. Instead of using pulleys above the brow/spring connections, I just installed a brass bar. The smooth surface of the brass bar seems fluid enough for the strings to pass smoothly as they lift the brows. But I still must figure out the best way to connect the two brow strings to a single string, and then avoid all of the other mechanisms as it passes down the neck. I think I can do it, but I need a little more head-scratching. (My head... not the dummy's).
The eyebrows, however, still have a ways to go. The mechanism is sound, but the string organization isn't quite figured out. Instead of using pulleys above the brow/spring connections, I just installed a brass bar. The smooth surface of the brass bar seems fluid enough for the strings to pass smoothly as they lift the brows. But I still must figure out the best way to connect the two brow strings to a single string, and then avoid all of the other mechanisms as it passes down the neck. I think I can do it, but I need a little more head-scratching. (My head... not the dummy's).
Wednesday, October 11, 2006
So why am I bending the rod AFTER I insert the rod?
Okay. Here's why. On the inside if the head, the brass rod comes through the tube and turns a 90-degree angle. At the end of the rod (inside the head) the rod is pre-bent into a tight little curl so that a spring can be attached. After the curl is there, obviously the rod won't go through the brass tube. Only the eyebrow-end of the brass rod can go through the tube... but not if it's bent, too. So I have to insert the straight portion of the eyebrow rod through the tube and THEN bend it to conform to the forehead (without busting the tube). That's the part that failed the first time with the little plastic tube. My hope is that the long brass tube will survive the bending.
By the way, I still haven't decided whether to attach soft fabric or a hard sculpted eyebrow to the eyebrow rods. That could be another story (disaster?) in the making.
By the way, I still haven't decided whether to attach soft fabric or a hard sculpted eyebrow to the eyebrow rods. That could be another story (disaster?) in the making.
Tuesday, October 10, 2006
Okay... how 'bout this?
After my failed attempt to build raising eyebrows, I have another idea.
In my first try, I ApoxieSculped a 1/4"-long plastic tube into the forehead. But when I inserted the brass rod and tried to bend it around the forehead to form the eyebrow, the small plastic tube broke away.
This time I cut a 1-3/4inch brass tube and ApoxieSculped the crap out of it through the front hole and into the head. I hope when I insert the rod into the tube next time, I can bend the brass rod against the forehead without breaking the brass tube away from the inside of the head. With all of the ApoxieSculp I used, it should hold.
I also have a strategy to keep the mechanics and strings from interfering with the eye and jaw mechanics. We'll see!
I've also started Charlie4 and 5. Charlie4 will have a new twist. I have cut out the top of the jaw piece so that bigger upper front teeth won't prevent the mouth from closing. I've also had to file away about 1/8-inch away from the opening in the neck where the bottom of the jaw clears. In this way, the mouth will open wider. But I'll have to add about 1/8-inch to the bottom of the jaw so it will seal the neck opening when the jaw is closed.
Following ANY of this?
I think this vent-building is becoming obsessive. I now haunt fabric stores and prowl toddler clothing sections at Goodwill. I'm sure the clerks wonder about me. Heck... I wonder about me!
Monday, October 09, 2006
Stuck again
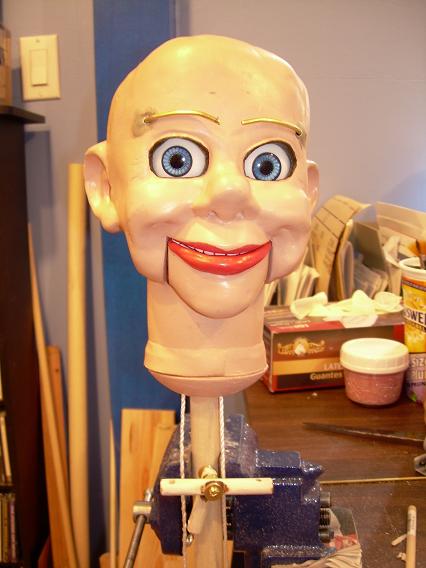
He's got eyes that move and are ready to be self-centered. But the moving eyebrows have me stumped. I think I just need to re-think the mechanics. I'm almost there, but not quite. In any case, here's the latest look. Also, I added batting to his body and shoulders. It thickens him up a bit.
Thursday, October 05, 2006
Holes in the (fore)head
Now I'm committed. I've drilled holes on the forehead for raising eyebrows. I bought some cool little hard plastic spacers to insert in the holes. The spacers are actually tiny tubes. I also used them in the far left and right sides of the jaw mounts inside the head. The axle rests inside the spacers.
I also bought some 3/32" brass rods from Hobbytown USA. I'll use them for the eyebrows and mechanics. Looks like there will be room inside the head for all the works. Very exciting!
I also bought some 3/32" brass rods from Hobbytown USA. I'll use them for the eyebrows and mechanics. Looks like there will be room inside the head for all the works. Very exciting!
Monday, October 02, 2006
A look at my progress

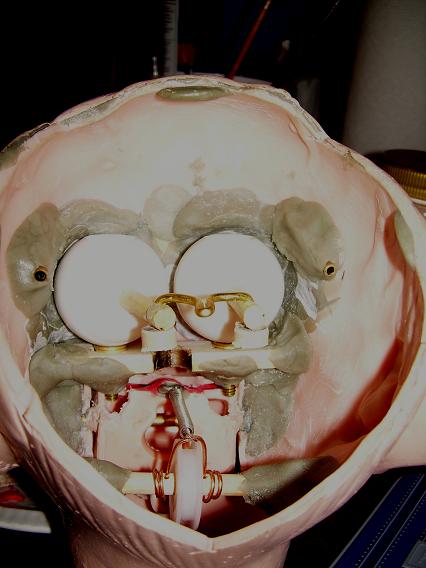
The jaw has been apoxied in place. The axle is made of brass. It rotates on a brass tube apoxied inside the jaw. Now I'm studying the raising eyebrow mechanics. My biggest concern is that there won't be enough room inside the head. I'm considering a set up that's a combination of Mike Brose's approach and that of Al Stevens.
First, I've got to find some 3/32 brass rods. My local hardware store is out of stock and I'm not sure they care. I may have to order online.
Subscribe to:
Comments (Atom)