

Welcome to the DummyStore.net blog, chronicling the adventures (and misadventures) of building professional ventriloquist dummies. It features tips, tricks and utter failures. Please feel free to submit comments, critiques and helpful suggestions.
Tuesday, December 31, 2019
Sunday, December 29, 2019
Divots

The deep divot in the side of the head is actually an intentional dent for an ear hole. I'm not going to sculpt a full ear because I'd rather leave the option open for the figure builder. This alien could have pointy ears, small exotic ears, flappy ears... or just an earhole.
Saturday, December 28, 2019
Filler up!

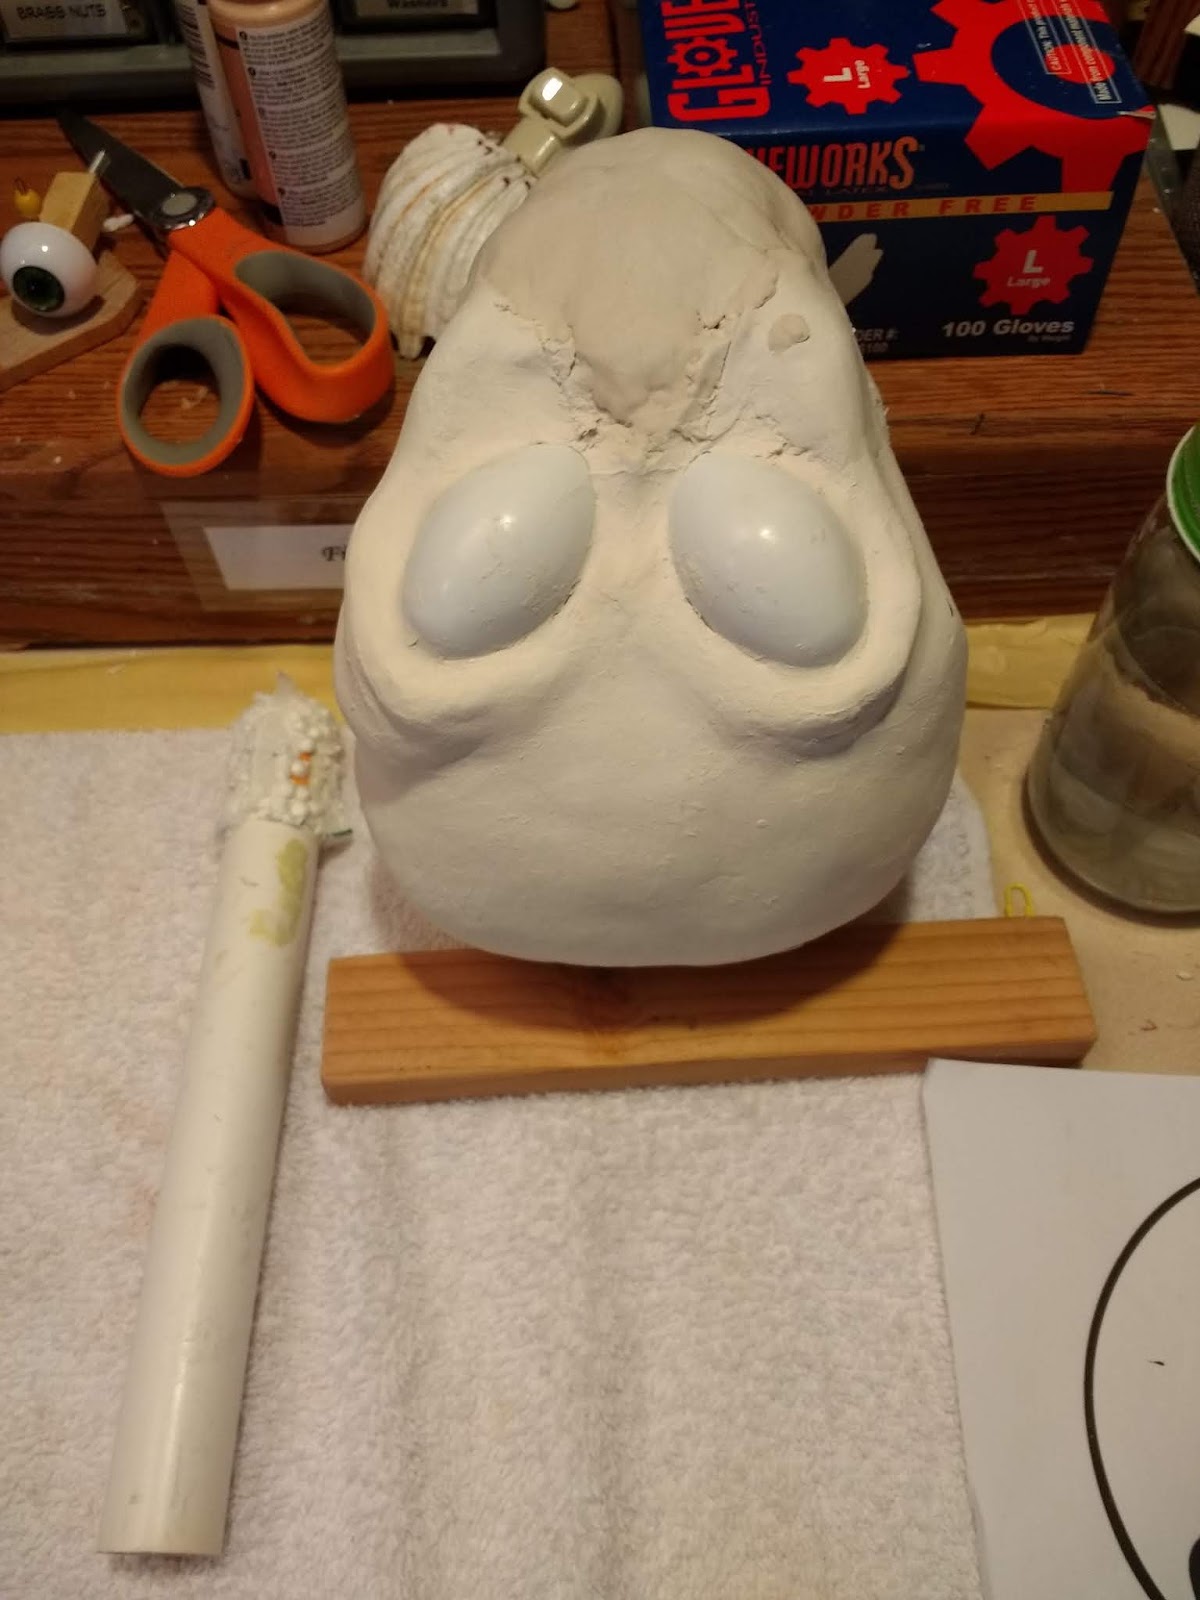
 After I cut out the underside, I fill the hollow interior with a tightly-folded paper towel. Then I cover that with Magic-Sculpt. After the Magic-Scult dries hard, I'll file the edges smoother.
 I've also given the head its first coat of paint. I prefer Behr house paint. The best flesh-color is called Coronado Dunes. I prefer flat-matte house paint because it's tough, goes on easy and dries very flat. Acrylics always seemed too shiny.
Friday, December 27, 2019
What the world needs now... well soon anyway


I sculpted this 2T Cheeky Boy figure about 5 years ago. It was one of the last projects I completed just before I decided to take a break from figure making. So, this little fella has been staring at me since then wondering if I'd ever bring him to life. Well, that time may not be too far off.
 He will be sent off to have a mold made of him. Then a polyurethane casting will be made so that I can cut out the jaw. From that jaw exterior, I will build at three-dimensional jaw piece. A mold of that will be made and from that mold will come a polyurethane casting of the jaw. Then the polyurethane head and jaw will be assembled into a brand new Cheeky Boy figure. That's the plan anyway.
.
Thursday, December 26, 2019
Neck and neck... and neck


I've been looking forward to working on the alien's neck. My client wanted it long and thin. That being said, I decided for the sake of practicality, it should thicken as it descends to the shoulders. As requested, I've attempted to make the bottom of the neck flat so a rounded transition can be attached. I've tried to make it round in the neighborhood of 2-3/4" in diameter. Patching and sanding will make it more precise.
As with all of the photos, lumpiness prevails. However, the uneven rolls of flesh on the neck are intentional. Seems more realistic that way (for an imaginary alien, that is).
There's some pre-sanding patching to be done. Then the sanding begins. Only then will I see the actual character truly emerge
Wednesday, December 25, 2019

Tuesday, December 24, 2019
All-around alien

 Using almost 2 packages of paper clay, I've covered the armature all the way around. Because some areas are wet and others dry, it appears he's even lumpier than he actually is. But make no mistake, he's plenty lumpy.
 After he dries completely, I'll tackle the neck. I'll sculpt it extra long with a flat bottom so a rounded transition can be attached prior to mold making.
The last step is sanding and patching, sanding and patching, sanding and patching until he's smooth, evenly contoured and mighty good-looking (for an alien).


Monday, December 23, 2019
Stick with Braylu
I plan to make side-to-side self-centering eyes, moving mouth, and raising eyebrows. The hole for the jaw trigger goes in the back of the PVC pipe 2-3/4" down from the bottom of the transition. The hole for the eyebrows trigger is drilled just above the jaw trigger at 2" down. The eye rocker hole is drilled in the front 3-3/4" down.
I drill four holes in the transition as close to the PVC pipe as possible so the strings won't get caught up in the neck hole on the figure's body.
The last step is to mount the head on the headstick. I use hot glue. Ta-Da!

Saturday, December 21, 2019
Five stages
The process of sculpting goes through a series of stages. Ambition, then bewilderment followed by disappointment, epiphany, and excitement. Today it's excitement. (Epiphany was yesterday.)

 Today I worked on the left side of the head and added more material above the left eye to better-match the right. Working on a new part of the face always brings progress and new problems. So sure enough, you head back to bewilderment and disappointment. But he's beginning to come around.
I've used more than half of my second package of paper clay. Amazon.com will be hearing from me soon.
Wednesday, December 18, 2019
Sharpie

I added the mouth area today. The right side of the nose needs ridges.
I thought it might help my perspective if I took a Sharpie and drew in some eyes for reference.
Next comes the neck.
And in the end, lots of sanding. (Won't THAT be fun).
Tuesday, December 17, 2019
What's THIS about?
 Before I proceed much further on my alien sculpture, I decided to reset the PVC post farther back in the head. That's because I'll build the neck around the post. I dug out a space in the styrofoam and used Tacky glue and some duct tape to secure the pipe to the head. Eventually, the duct tape will be covered in paper clay.
The neck will be longer than the average vent figure, but certainly not as long as the post. The post is there to make it easier to handle the sculpture. After the neck is built, I may saw off the excess PVC pipe depending on my client's preference.
Monday, December 16, 2019
Starting a conversion figure
 The last two conversion figures were already in process and pretty far along when I decided to finish them. Now I'm starting work on the third conversion figure that's not too far along. It's a standard Goldberg or Juro Charlie McCarthy doll head. Here are the first steps in preparing to convert it into a pro-style figure:
I begin by clearing out the eyes. I start by drilling a small hole or two in each eye. Then I take a Demel tool and scrape out the eyes until I have two clean eye sockets.
Next, I saw off the back of the head so I can eventually install mechanics for the animations. My plans for this fella include raising eyebrows, side-to-side self-centering eyes, and a steel-spring activated mouth.

After that, I use a Dremel to rough up the head's interior. I'll use Magic-Sculpt to mount some of the mechanics and it doesn't grip as well on smooth surfaces.

Lastly, Charlie McCarthy stock jaws are known not too open too wide. So I carve out the bottom of the jaw to make more room for the jaw to open. I'll use Magic-Sculpt to build a concave lower jaw.
After all that, the real work can begin.
Sunday, December 15, 2019
Snappy Slappy


Slappy is a very popular Goldberg doll. He makes an excellent conversion ventriloquist figure. This fellow has been upgraded to a fully professional setup with controls on a Braylu headstick. He features side-to-side self-centering eyes, a moving mouth with steel spring action, a very nice wig, and a hollow padded wood body. He's also sporting a brand new 4-piece dress-up outfit with slacks, tie, shirt, and vest with an opening in the back for hand access. (Shoes not included).

 And yes, he's for sale on DummyStore.net and Ebay. He can be yours (or someone else's as a gift) for just $450 plus shipping.
Friday, December 13, 2019
Meanwhile...

Rather than repaint this Slappy head, it's in such good shape and he's such a popular character, I've decided to upgrade him with moving eyes and mouth. I'll put a wig on him and give him a fully-professional hollow wood body. He'll have pro-style controls on a Braylu headstick.
Once completed, he'll go up for sale on DummyStore.net. Someone will get a kick out of this popular character.
Thursday, December 12, 2019
A picture is worth a thousand mistakes
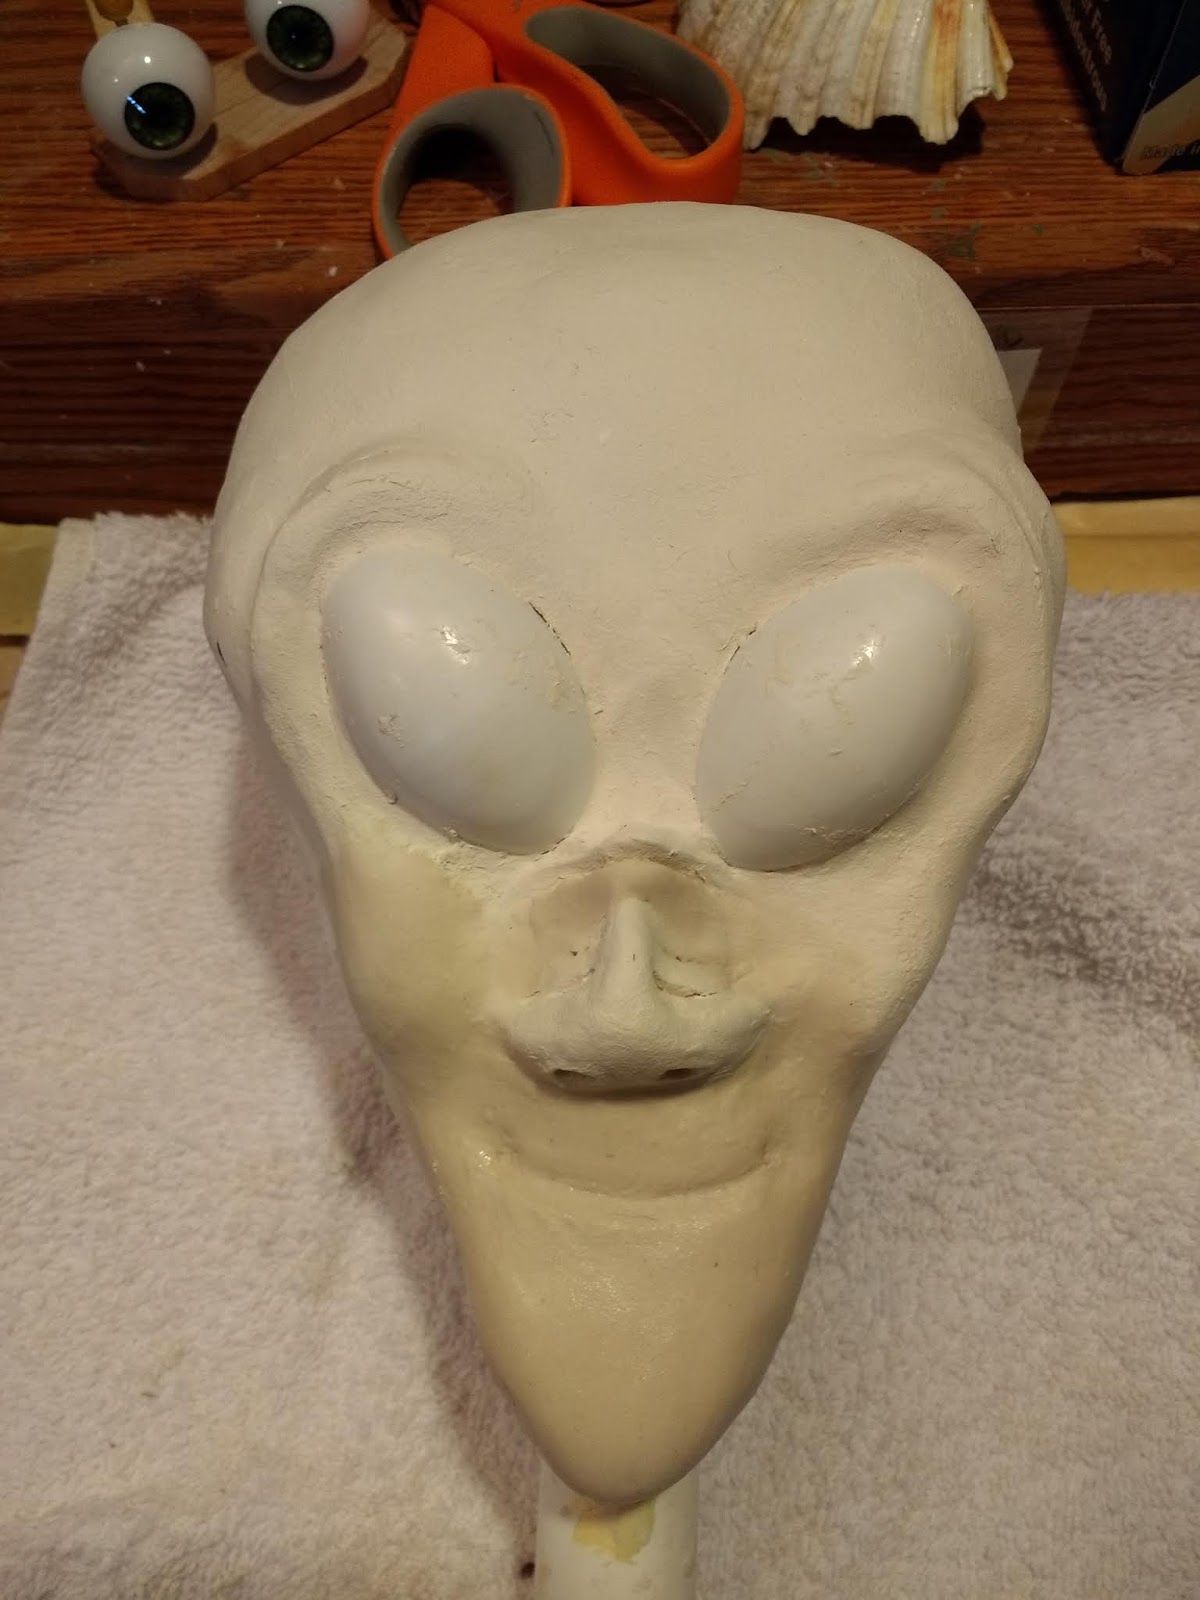
 I'm compiling a list of fixes I need to apply to this alien sculpture. The right side behind the eye needs to be taken down. The top-left of the head needs to be built up a bit. I really recommend you photograph your sculptures because they reveal all of the hidden irregularities.
 The nose is supposed to have some subtle ridges. I've struggled with how to make them. The wet clay approaches didn't satisfy me. Next, I'll try some dry clay approaches by cutting into the dry clay. If that doesn't work, I'll try a few more wet clay ideas.
Wednesday, December 11, 2019
One step forward, two steps back
I knew I was headed down the wrong road, but you never know when serendipity might open a better pathway. That didn't happen here.
I've ripped out the nose, mouth and chin and pulled the post from the armature. Luckily I live in Oregon where it takes longer for paper clay to dry.
I'll re-seat the post farther back in the head. I plan to make the nose flatter and the chin rounder. I also might widen the cheek areas, This will get me closer to the original drawing.
Tuesday, December 10, 2019
Friendlier
However, he's turning out a little long in the face compared to the original drawing. I could either continue as he is or widen his cheek and mouth areas.
Time to check with my client and see which way he wants to go.
Either way, I think I'll have to remove the headstick and move it farther back to accommodate the long neck we intend to give him.
Monday, December 09, 2019
Now... don't panic.
 They say it's best to NOT to watch the making of laws or sausage. Perhaps we should add the making of an alien ventriloquist figure. I must admit, the alien sculpture is looking kinda gross. Part of the problem is he has no mouth. And then I had to apply some duct tape to re-secure the armature to the post. Ugly, huh?
 Believe it or not (I wouldn't blame you if you decided on "not"), this other-worldly feller is supposed to look friendly. Just give me more time.
Each of the ridges on the nose must be applied on a one-per-day basis. The first one must dry completely before I sculpt the next one.
The mouth could actually be added tomorrow... maybe.
Sunday, December 08, 2019
Eye catching


 After years of trial and error, trying various products on the market and various ways to prepare them, I found a way to make eyes for 2T and conversion figures. I buy 28mm plastic eyes from a doll supplier. They actually come with a rounded back and small stem, but I don't use the backside. I separate the front half of the eyes.
I fill the interior of the hollow half-shell eyes with a bit of Magic-Sculpt. Then I insert a 1-3/4" length of 3/8"-square piece of wood into the Magic-Sculpt. I use a small probe to scoop the Magic-Sculpt around the wood on all four sides so it grips the wood.

After the Magic-Sculpt hardens, I drill holes in the wood just behind the plastic eyes so that a rotation rod can be inserted on which the eyes will turn. I also drill a hole at the end of the wood so that a spring can be inserted for the self-centering action. Once mounted on an eye tray, I secure the eyes with a small wooden bead. The next step will be to synch the eyes together with a plastic sync bar I buy from Braylu Creations.
Friday, December 06, 2019
Overhead

Thursday, December 05, 2019
For Sale


My little Asian boy is completed and ready to find a new home. I decided not to add the mustache and chin whiskers because... well... he's just so darn cute the way he is. He'll be for sale on DummyStore.net and Ebay.
His mechanics are simple and smooth. He's a conversion figure with moving mouth and self-centering side-to-side eyes.
His asking price: $450 plus shipping.
Wednesday, December 04, 2019
Nearly done


My entry back into the vent-building biz is starting by finishing the project I left unfinished 5 years ago. I have two more conversion figures to build before I allow myself to tackle one of my original characters.
This little Asian fellow will also get a mustache, small whisker on the chin and a black braid. I already have the body and beautiful traditional silk-like Asian costume. Mechanics are simple... just a jaw and self-centering side-to-side brown eyes. As soon as he's whiskered, he'll go up for sale.

Subscribe to:
Comments (Atom)