Friday, February 28, 2020

First get a nice casting... and then you WRECK it


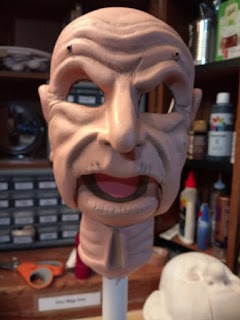
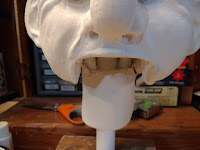
Yesterday this was a nice clean casting of my original sculpture (above left). Now after taking an electric saw, hand saw, power drill, and various Dremel bits to it, it's an official wreck (above right).

No panic here because after cutting off the back of the head, poking out the eye sockets, cutting out the jaw cavity, roughing up the interior, and smoothing the edges all around, I'm usually left with some patching. Sometimes the hand slips or the plastic gives way unexpectedly. Nothing a little paper clay or Magic-Sculpt can't fix.

The first step is always a little nasty.

Thursday, February 27, 2020

Look what I got!


As I've mentioned before, I sculpted a new 2T cheeky boy just before I took a five-year hiatus from ventriloquism. It sat on my workbench the entire time. Now that I'm building again, I had a mold and castings made. And today I received the very first casting.

This little guy will be the first of its kind. He'll measure in at about 32"-tall. The 28mm doll eyes will fit perfectly in this fella's sockets. Throw in some rosy cheeks, a sprinkling of freckles, a head of hair, and he'll be ready to annoy someone.

As always, body by Braylu.

Tuesday, February 25, 2020

Debut

I'm pleased to introduce "Mr. Winkle", my newest full-size figure fresh out of the shop. I enjoy making the figures, but I also like photographing them. And yes, talking to them. As you will see in the video, Mr. Winkle talks back.

He is being offered for sale on DummyStore.net. Someone who likes arguing might like to argue with him. Mr. Winkle is perfect for that.

Drop me an email if you're interested.

Friday, February 21, 2020

See what you made me do


I'm getting tired of this subject, but this sculpture is turning out to be a marathon. After today's powwow, it was decided that I need to remove the fat roll under his ears and to make the lower part of the fat-roll appear to be hanging down. I agreed. So, I took out my handy-dandy Dremel tool and started hacking away. I had to remove a fair amount of material; both under the ears and behind the ears. It's hard to tell in the whole-head photo on the left, but he does look better, hack marks aside. Now I need to get out my sponge sandpaper and start the smoothing process around those areas. I might have to patch a spot or two as well.

I also removed the three-dimpled chin material and returned to the dumb- chin look. He'll retain more of that pitiful cartoony look.

Thursday, February 20, 2020

Before or after fat

After Fat
Before Fat


Just when I thought I was ready to go.

I've gotten feedback that my sculpture looked much better before I added the roll of fat on his cheeks and under his chin. The photo on the left is "before". The photo on the right is "after". My wife and I have been eyeing the head trying to figure out why it doesn't look quite right. I can actually envision the character painted up with the roll of fat, but I might be miscalculating.

So I'm contemplating sanding off the roll. I might return to the original dumb chin, too.

DARN!

Wednesday, February 19, 2020

Awwww-struck

There are only a few steps left before I'm ready to have a mold and castings made of my overweight oddball. I've accomplished the first step. I covered the jaw opening with a cover. That cover will be removed from the plastic castings by cutting or drilling along the dotted line. With a little sanding or filing, the jaw piece should slip right in.

The last thing I need to deal with is the transition. Currently, the neck comes down to a flat bottom similar to a McElroy figure. I'll add a rounded Braylu "ball n socket"-style transition to this sculpture.

I'm already thinking about my next character sculpture. The next one will be a skinny guy.


Monday, February 17, 2020

The last to know


From my "last to know" file comes a new discovery thanks to Buzz at Braylu Creations. I have been sanding my paper clay sculptures with regular sandpaper. It's usually hard on my hands, but I have persevered. Buzz and I Skype from time to time to show-and-tell recent projects, ideas, and innovations. If you follow this blog, you know I've been preparing my fat guy sculpture for eventual mold making. It needs to be as smooth as I can possibly make it. During our most recent Skype, he showed me sponge sandpaper. It's available in a variety of grits. The HUGE advantages are they are easy on the hands and they conform to the shape of what you're sanding. I immediately visited my local hardware store and bought some. I LOVE IT! I was able to quickly and easily do the fine sanding on my fat guy sculpture. I'm always the last person in the universe to learn about these common tools.

Finally, the fat guy jaw is completed.

Sunday, February 16, 2020

Shuttin' him up?


Why is there wadded-up paper towel in his mouth? To quiet his complaining? To silence his haranguing? To muffle his whining? To shush his grumbling?

No.

In preparation for the mold, I'm going to build a paper clay cover for the mouth. The paper towel is used to fill up space so I won't need to fill the entire cavity with paper clay. I'll use a sharp poking tool to indicate cut-lines around the perimeter of the cover. That's so I (and other vent figure builders) will know where to cut away the cover on the castings of the head. When the cover is... well... uncovered, a casting of the jaw you see pictured here will fit inside the opening with (hopefully) minimal gap adjustment.

Speaking of the jaw, it's almost done. I want to even out the spaces between the teeth, fill a couple of sanded areas, then do a final sanding.

Friday, February 14, 2020

Showin' off

Thursday, February 13, 2020

Step by step


Here's a collection of photos as I sculpted this character. Starting at the top-left (finished) to the bottom-right (a stack of foam I used as the armature), I progressed slowly to complete this new figure's model. I actually have one more task. I'll add teeth and tongue to the jaw. Then he'll be sent to Braylu Creations to have a mold and castings made.


Wednesday, February 12, 2020

Hard way


I decided to go with hard brows. I sculpted the eyebrows over the brass rod frames. I scored the Magic Sculpt with a sharp sculpting tool to give the brows a hair-look.

I'm in the home stretch of this project. I installed the eyehooks for the side-to-side self-centering eyes, the pully system for the jaw, and the pully system for the raising eyebrows. I'll add the cords next and prepare the headstick for the triggers. I'll use a rocker system for the eyes.


Tuesday, February 11, 2020

Sweat of the brow


I hold my breath when I'm bending and installing the eyebrow frames in the head. I bend the "hooks" for the springs first. That's not too tough. After inserting the rods into the head, I have to bend the rods again on the head exterior. That's the tricky part. If I bend the eyebrow frame too close to the tube opening, the eyebrow won't move up and down in the tube. I tape a popsicle stick to the forehead next to the tube opening and bend the eyebrow over the stick. That seems to provide enough clearance for the eyebrow to move freely in the tube. I do it this way because I don't solder.

Inside the head, I attach the spring to the "hooks". The next step will be to install a spool above the hooks so a cord will lift the eyebrows.

I typically sculpt Magic Sculpt over the frames to create the actual eyebrows. Sometimes I make the Magic Sculpt as flat as possible so I can attach furry fabric to make bushy eyebrows. I'm undecided which way I'll go with this old grump.

As you can see from the interior photo, I've also synched the eyes and installed eyehooks to attach cords. I'll install eyehooks on each side of the head to thread the cord.

Monday, February 10, 2020

Overnight weight gain


Mr. Winkle now has his eyes in, though they have not been synched. I'm also working on gap adjustment, thus the discoloration around his jaw. That's paper clay that needs to be finely sanded and painted. I attached the steel spring to the jaw and base. 

My obese brooder has gained even more weight overnight. I put more fat below his ears and brought the roll of chubbiness higher on his cheeks. I was able to remove the jaw and pop it back in. I might be finished with the head sculpting. Now comes the serious sanding and patching. The last thing I'll do is sculpt the teeth and tongue on the jaw piece.

Sunday, February 09, 2020

Weight gain


I added a roll of fat to my panicked plump little friend. With the clay being wet, it looks more like a neckbeard at the moment. After it dries, I'll have a better perspective. I may need to expand his blubber higher on his cheeks. My plan is to have the jaw open and slide over the roll under the jaw. I'm not sure that's going to work and I may not find out until after the first casting of the head and jaw. I still have a ways to go, so another idea may pop up.

Saturday, February 08, 2020

Tedium

The most tedious part of sculpting for figure making is the sanding, patching and sanding again... and again. The photo on the left shows a fairly smooth sanded side. There's still more sanding and patching to be done, but it's coming along.

The photos on the right show areas that have been sanded once. After the initial sanding, I mark divots and bumps with a pencil. I'll fill the divots and sand the bumps. This process happens until I switch from 100-grit to 300-grit sandpaper for the final smoothing.

Meanwhile, I continue to work on the jaw and jaw opening trying to get the jaw to fit tightly with very narrow slots. That's another tedious but necessary process.

When does the real fun start?

Thursday, February 06, 2020

New cheeky

 Braylu Creations sent me the photos of the first castings of my new 2T cheeky boy character, I sculpted him five years ago just before I bowed out of the vent world. The little fella has been staring at me ever since just waiting for me to make a move. Now that I'm back in the vent world, it was time to have a mold and castings made.

The parting lines still need to be sanded off and the gray spots will fade, but he looks great to me.
The next step is to cut away the jaw and build a three-dimensional jaw for molding and casting. Then I'll be able to build the very first figure of this new character.

Wednesday, February 05, 2020

Skin game


It took me a while to remember how I painted detail on my figures, particularly the wrinkles. After I painted a brownish thin line in the base of the wrinkles, it finally came to me.

I use a dabbing brush to apply a somewhat darker shade of the skin-color paint. After that dries, I repaint the rounded crown of the wrinkles, using a brush or dabber, with the lighter original flesh color. I've also lined the eyes. This time I used a medium-brown rather than black.

The jaw is temporarily mounted in the head for show purposes. The tongue needs another coat, then it's ready to be mounted permanently.

Tuesday, February 04, 2020

Gimme some lip


This actually might work. It may require some adjustment of both the jaw and the slots. After the paper clay dries, I should be able to remove the jaw to make those adjustments. I added the lower lip overbite to the jaw. I like the way it looks. This character can be a stubborn cuss or a great big scardey cat.

Monday, February 03, 2020

Say "Awwww"


I really don't know if I'll pull this off. I\'ve covered all four sides of the jaw. I've tried to make the sides parallel. I have tried to make the curve of the chin curved evenly. It's what's next that boggles my brain.

My first intuition is to sand the jaw, then place it back into the head... somehow... temporarily... then finish the head sculpt around the jaw. I want to add a double chin under the jaw area. With the jaw in the head, I'll also add a larger protruding lip to the jaw.

At some point, I will remove the jaw and sculpt teeth and tongue behind the faint pencil line you see on the jaw. Finally, the plan is to seal the jaw cavity in the head in such a way as to make it easy to remove on casts of the head.

The goal is to create a separate jaw that slides easily, but tightly into the head casts with as little gap adjustment as possible.

Sunday, February 02, 2020

House painting

It may have been Mike Brose's book that mentioned using house paint to paint figures. No matter where I first heard about it, I decided to give it a try. I was wandering around a Home Depot several years ago when I ambled by the paint department. I browsed through color samples until I found a hue I thought would be perfect for Caucasian skin color. I ordered a sample and took it home. After applying it to a figure I was building, I was amazed at how much better I liked it. Here's why:
- The paint brushes on very smoothly
- It dries quickly and VERY flat. Even with so-called flat "artist-quality" acrylics, I never liked the shine. The house paint was so flat it almost had a soft aura-glow quality.
- The brushes cleaned up easily.

For a while, I was embarrassed about using water-based house paint. I kept it a secret because most figure builders I knew always touted "artist-quality" acrylic paint. But I attended the Vent Haven Convention one year and signed up for a seminar on figure building by the great Alan Semok. During the workshop, he discussed painting figures and touted the use of... you guessed it... HOUSE PAINT! I've been unashamedly using it ever since.

I just applied the first coat of Behr "Coronado Dunes" flat house paint to my Winkle figure. It usually takes three coats for a solid finish. I don't use any so-called "protective coating". It tends to add shine. Just flat house paint. Works great!