Thursday, November 29, 2012

Glutton for punishment

My client has already given me permission to wave the white flag. But I stubbornly decided to give it one more try. If I can't make a winker this time, then I'll complete the figure without it.

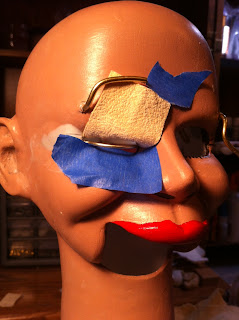
I built a new frame and installed it in the head. Tomorrow I'll attempt to attach the chamois being extra careful to keep the glue away from the axles. 

Of course, I still have to install the actuating mechanism which is more new territory.


Wednesday, November 28, 2012

Things were going so well

Stop. Take one step forward. Stop. Take 2 steps back.

I got this far. Frame installed. Moves smoothly. Cut chamois. Tape it up on the inside. Apply glue to frame. Drape chamois over glued frame. Get glue all over the frame's tubes.

Wait a minute. That last step. Get glue all over the frame's tubes. I wasn't supposed to do that.

The winker frame that moved up and down so smoothly suddenly moved like running in a bad dream. Had to rip out the frame (thus destroying it). That's where the Stop. Take 2 steps back thing comes in.

I will move forward. Lesson learned. (Geez I wish there was an easier way).

Tuesday, November 27, 2012

Never give up

My quest to make a single winker continues with this step. I have secured the axle tube on the outside of the eye socket and Magic-Sculpted the wrap-around wire "tube" on the inside of the head. I have confirmed that the winker frame will clear the eyeball.

When it all dries, I will add the soft chamois eyelid. Then comes the actuating mechanism.

Wonder if I pull this off this time?

Monday, November 26, 2012

Big heads

Ventriloquist Marc Rubben is a very funny guy. I especially like his Bighead characters from Robert McRay's studio.

Wednesday, November 21, 2012

Happy Thanksgiving


Monday, November 19, 2012

Just one

If you've followed this blog for awhile, you're probably aware of my futile wandering in the land of blinkers and winkers. Well... here goes again. It's another trip down winker road. But this time I only have to make one eye wink. That's all. Just one winker. The other eye never blinks or winks. 

Can I make at least one eye wink?

I've explored hard blinker avenue and soft winker boulevard. One or both may be blind alleys. Either way, it will be attached to a soft-winker-style brass frame.  

I'm head-scratching over the interior mechanism. Looks like it will need its own pulley. I'd hoped it could use the same pulley bar as the eyebrows, but it needs to be deeper inside the head. To accommodate the actuating lever, I may need to cut a hole in the eye tray to make way.

And then there's the chamois. Can I avoid the bunch up? How lost do I sound?

Wednesday, November 14, 2012

Pretty close


She's getting better looking. My wife gave me a book on drawing people. She pointed out that women have a slightly more pointed jaw than a man's. So taking her suggestion (as any good husband would), I sculpted a distinctly more pointed chin. I also closed the gaps in the jaw.

One comment regarding the sculpting of the chin... I used Free Form Air rather than Magic-Sculpt. I'm getting much more comfortable with the substance and I expect I'll use it more often.

I need to do some finish sanding before I add a coat of primer.


Sunday, November 11, 2012

Beauty or beast?


She may not look like much now, but this face will eventually be a floosie... a tart... a lady of the evening. It's a project for a client. I'm using a Braylu Standard head. So far I've altered the nose (with Free Form Air), enhanced the upper lip (with Magic-Sculpt) and done some fill work (again with Free Form Air).

In the corner of the right eye, I've installed a very small section of brass tube. I plan to add a winker to that right eye socket.

Saturday, November 10, 2012

Looking for a retirement home

Uncle Earl is now looking for someone to argue with on Ebay.

Thursday, November 08, 2012

And now the video...

Wednesday, November 07, 2012

He's old, but he's new


I just completed a 42" Uncle Earl figure. He wears glasses so he can recognize his new partner when he finds one. They're also handy for catching the right bus back to the old folks home. (Last time he forgot to wear them and he ended up at a Megadeth concert... which turned out okay because he couldn't hear them anyway). 

He'll be for sale real soon.

Tuesday, November 06, 2012

Trash talk

Dopey me. After carefully measuring and cutting up the PVC pipe into 8.5" segments... after drilling slots and installing a tube 'n' rod eye control in one of the sticks... after all that... I try setting the headstick into the hole of a headstick holder only to discover that the circumference of this PVC pipe is oh-so-slightly larger than the holes... rendering all 13 of the headsticks useless.  

In disgust, I threw them all into the trash. 

Now this morning, I will rescue them from the trash can and store them in some drawer for later use. You never know when you might need a headstick with an oh-so-slightly larger circumference.

(It's probably good I didn't take up brain surgery as a hobby.)   

Sunday, November 04, 2012

Chicken/egg

I installed a tube 'n' rod eye control in this headstick. I usually attach the headstick to the head early on. But if I install it now, the tube will block installation of the jaw. If I attach the headstick after the eyes and jaw are installed, I have to work with the head without the headstick... which makes it more difficult to handle and store. If I install a headstick before I install a tube 'n' rod, the tube 'n' rod will be nearly impossible to install with the headstick attached.

Somehow I need to defeat the space/time continuum.

Hmmmmm.


Friday, November 02, 2012

Coming attractions


"The more puppets, the better" is always a sound policy. Check out FlexiTube.

Post time

I prefer to use PVC pipe for my headsticks. I usually buy a long stretch of PVC and cut it into 8.5" lengths with a hack saw. I get 13 headsticks plus one more that's just a little shy of 8".

I intend to switch from rocker-style eye controls back to tube and rod controls. I'll also experiment with embedding triggers and axles in the PVC pipe rather than attaching them to the outside with screws and washers. That method really hasn't been a problem, but I'd like to try it for fun.

Next comes hole drilling.