They say the first step is admitting you have a problem. Okay... I admit it. I can't make a decision.
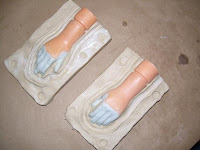
Now that I've come to grips with that, I step boldly forward and declare... here it comes.... SKIN MOLD! (It took a couple of weeks just to decide WHICH method to make my first mold).
I unpacked the five pounds of Klean Klay (a sulfur-free clay) and planted the hand models in it. I etched a gutter around the models as instructed by Mike Brose's book "Figuremaking Can be Fun". I made some keys with the end of the handle of my sculpting tool and a twirl of my little finger. (The keys are the round impressions near the edges of the clay forms. They will help to line up the two halves of the skin mold).
Next comes the application of silicone rubber and the making of the mothermold (either of hard plastic or plaster bandages).
This is a big deal for me in my quest to make vent figures from molds. We'll see how the next step works out.
Sunday, November 25, 2007
Friday, November 23, 2007
It's always something
It seems every project has its successes and frustrations. I'll cover the successes first.
I have been working on a conversion figure to sell on Ebay. It's a Charlie McCarthy doll. I plan to keep the face stock and add pro-style mechanics (self-centering eyes, raising eyebrows and a jaw with brass axle). My conundrum was painting irises on the eyeballs that were close-to-perfectly round. After several lame attempts at painting by hand, I finally reviewed Mike Brose's suggestions in his fine book "Figuremaking Can Be Fun". One method he covers is printing an iris on a computer printer. Al Stevens has an oversized iris on his Fred Project website for folks to use (thanks, Al). So I sized it and printed it on an Epson printer. I carefully cut out the two irises and glued them on the pre-painted eyeballs. Then I varnished the eyeballs and irises with a glossy finish. Of all the methods I tried, this method provided the best result by a mile.
Now the frustration. Awhile back, I bought a pack of 1-1/2" wood ball knobs at Joann's Fabrics. I made eyeballs, around which I sculpted my models for molds. But then Joann's stopped carrying the 1-1/2" wood ball knobs. So I ordered a package of 48 ball knobs from a woodcrafts website, 1-1/2" in size. Well, as it turns out, the new ball knobs are ever-so-slightly larger than 1-1/2", and they won't fit in the models I've sculpted for moldmaking.
I still plan to sculpt yet another head, so I'll use the new ball knobs for that sculpture. Meanwhile, I'm still hoping to find "Creative Wood" brand ball knobs sold by Joann's Fabrics, preferably the pack of 9.
Thursday, November 22, 2007
Saturday, November 17, 2007
Wednesday, November 14, 2007
Boxes
The first shipment of molding supplies has arrived. I purchased tin-based silicone rubber, a thickening agent and casting material. The next box due to arrive will contain Klean Klay and plaster bandages.
The Klean Klay will be used primarily as a bed for a skin mold. The plaster bandages will be used to make a mother mold. I'm going to make a mold of the hands first. If they succeed, then I'll work on the jaw piece. Once I've mastered the process (or at least not really screwed it up), I'll make a mold of the two head designs I've created.
Saturday, November 10, 2007
Back from paradise
Sorry, no blog entries due to a vacation in Puerto Vallarta. Though my mind would occasionally drift to moldmaking, sculpture, silicone rubber and other vent-building topics, mostly I read, ate, drank beer and sipped shots of 100% Agave Cassadora tequilla. My only ambition was to be as unproductive as I possibly could.
In this effort, I was entirely successful.
Subscribe to:
Posts (Atom)