 Now my first full-size figure has raising eyebrows, eyes and eyelids (not blinkers... maybe next time). I still need to add the eye synchro inside the head, the jaw axle, eye hooks for the cords, etc. But he's closer to completion, maybe by the end of the weekend.
Welcome to the DummyStore.net blog, chronicling the adventures (and misadventures) of building professional ventriloquist dummies. It features tips, tricks and utter failures. Please feel free to submit comments, critiques and helpful suggestions.
Friday, September 30, 2011
Head of the line
Now my first full-size figure has raising eyebrows, eyes and eyelids (not blinkers... maybe next time). I still need to add the eye synchro inside the head, the jaw axle, eye hooks for the cords, etc. But he's closer to completion, maybe by the end of the weekend.Thursday, September 29, 2011
Can't stop fiddlin'

Me and Buzz James (of Braylu Creations fame) can't seem to stop messin' around with mechanics design. It seems hundreds of years of vent figure building would settle the issues. But noooo. We have to keep trying new things, new approaches, new techniques, new gizmos.
This is Buzz's latest idea, which I have employed on my full-size figure. Rather than use an eye tray, these doohickeys provide a slot by which one can slide the eyeball forward or backward into its proper placement. Once the eye is in place, mark the bolt location, remove the gadget, slip the eye off the bolt axle, lock the bolt in place with a nut on the top side of the doodad, slip the eye back on the axle, apply and secure the top washer and nut, put it all back in the head so the eye is in a perfect position. Then Magic-Sculpt the hooskerdoos to the front of the head's interior.
The photo here, however, does not represent the proper order of things. I should have installed my backsprings first so that when I went through the process above, I was ready to install the eyes permanently. I have to remove the eyes, install the springs, re-install the eyeballs onto the axles, then Magic-Sculpt the bolt in the slot from the bottom to keep it from slding. If I'd have installed my backsprings first, I could have secured the bolts in place with a nut under the eyes.
Live and learn. But I like Buzz's new thingamabob. (We need to give it a name)
Sunday, September 25, 2011
Progress report
 My 3T figure ...(I gotta come up with a name...any suggestions?)
Anyway...
My 3T figure has been painted. Now the fun begins. The mechanics.
I'm taking careful note of the measurements. I'm attempting to design in three dimensions. That's always a challenge for me, a guy that didn't make it past Algebra II. The eyebrows went in rather nicely. The spring size is larger than the one I used for 2T.
Next comes the eyes. One thing I can already confirm. It's GREAT having all that room in the head!
Next comes the eyes. One thing I can already confirm. It's GREAT having all that room in the head!
Saturday, September 24, 2011


Friday, September 23, 2011
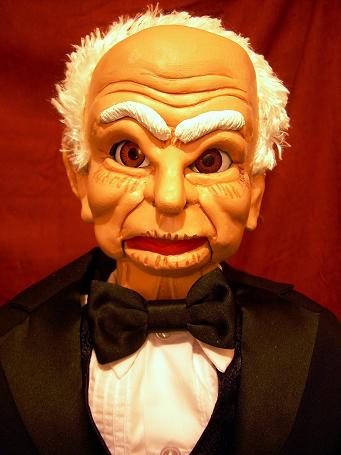
Yuks in a tux

Mr. Winkle is on his way to make New York City audiences giggle. He's certainly dressed for the Big Apple.
Thursday, September 22, 2011
Monday, September 19, 2011
Ahhhhhhh
 I've painted my full-size figure's jaw and coated the mouth interior with glossy varnish. I like that wet look.
 Sunday, September 18, 2011
Givin' 'em the slip

Saturday, September 17, 2011
Something to say?
 He sure looks like he wants to talk. A few more weeks and maybe he will.
 Now his jaw has its first coat of paint.
Friday, September 16, 2011
In the pink
 I'm moving forward slowly with my new 40" figure. So far he's been filled, sanded, primed and painted (first coat). I still have to sand the jaw, then prime and paint. He's gone from uurethane white to people-color.
I've been so busy working on my orders, I'm going slower than I'd like. But it's so exciting every step of the way.
Thursday, September 15, 2011
Under the gun

The dollars will be welcome, but most of all, I want a photo of Mr. Winkle and his new celebrity (not known as a ventriloquist) partner. That'll be really cool!
Monday, September 12, 2011
Under done

Sunday, September 11, 2011
The hole story
 Q: Your website indicates that the figures are clothed when delivered (including shoes). Is there a website I can go to that sells clothing for dummies so I can have various outfits? My friend, who Uncle Earl resembles, is an ex-police officer and I'd like to find a uniform that would fit Uncle Earl as one of his outfits. I see that the size is 2T, and there are websites that sell toddler clothing (even costumes), but obviously they wouldn't have the access in back for controlling the mouth, etc.
Any advice you can provide will be appreciated.
A: None of the 2T clothes I dress my figures in had the opening in the back when I bought the clothes. I cut the slit in the back and use Heat-n-Bond iron-on hem adhesive tape on the edges of the slit. I purchase some clothes new, some used at local thrift stores and Ebay. Braylu Creations also sells clothes for 2T figures.
Saturday, September 10, 2011
In the paint

A: I buy my paints at a local art supply store. I use artist-quality M.Graham acrylic paints rather than craft-quality paints which are sold at most craft stores. Before I add my first coat of paint, I apply a coat of American Accent primer made by Rustoleum. It ensures the acrylic paint will adhere properly.
To make a Caucasian skin color, I start with White, then add Burnt Sienna until the color turns skin-color beige. Add Cadmium Red for an "in-the-pink" tint, then mix in Naples Yellow to taste.
To make a Caucasian skin color, I start with White, then add Burnt Sienna until the color turns skin-color beige. Add Cadmium Red for an "in-the-pink" tint, then mix in Naples Yellow to taste.
Good luck with your project!
Wednesday, September 07, 2011
Painted hands

There is yet another new and different style available now. Gotta try 'em out next!
Monday, September 05, 2011
A new doodad


Occasionally I'll design some kind of gizmo to accomplish some wild scheme. Here's an example that seemed to work. I wanted to mount the eyes separately without an eye tray. The first time I tried it, I found myself wishing I had some kind of thingy that would mount to the top of the head. So I drew up the doohicky you see here and Buzz James at Braylu Creations cast the part for me.
I drilled a hole in the whatchamacallit so I could screw the bolt into it. The ridges at the top of the gadget provide a ledge for the Magic-Sculpt to latch onto.
The improvements I might suggest to my own design are:
- Make it round instead of square.
- Make it longer so it requires less Magic-Sculpt.
Any other suggestions?
Saturday, September 03, 2011
Lock jaw
 I'm under a deadline (October 1st) to complete my first full-size figure of my own design. So far I've cut the trap door, jaw and eye openings. I also marked the slight depressions in the head that need to be filled with wood filler.
 Today I roughed up the head's interior so the Magic-Sculpt will stick when I mount the mechanics. I also rough-sanded off the mold lines. Then I temporarily mounted the jaw inside the head on slots made from Magic-Sculpt. After the slots dry a little, I'll pulll the jaw out for later permanent installation.
I will need to fill the sides and bottom of the jaw opening for a tight fit. I may also add some thickness to the bottom of the jaw for nice slot-jaw movement.
Now, this is fun!
Friday, September 02, 2011
Just browsing
 I usually go with hard eyebrows. I enjoy shaping and sculpting the eyebrows in Magic-Sculpt. I like slightly unique bends, too. Adds a touch of character. My Elmore hobo is going to have thick and moderately unruly eyebrows.
I plan to mount the side-to-side eyes independently rather than use the eyetray. In fact, I cut the eyetray in half after realizing it wasn't cooperating. Yes, that's what happens to incorrigible parts in Dr. Croes' mad lab (cue the cackle).

I designed a "mounting spacer" for installing eyes one at a time. Buzz James at Braylu was kind enough to cast the part for me. I have no idea if the thing will work. I already made a modification to my scheme. Now I get to try it out.
Thursday, September 01, 2011
How I roll

Subscribe to:
Posts (Atom)